
In the third part of this serie we will evaluate the possible deployment strategies for your SQL Server DB projects across instances paying special attention to our Production environment.
This article won’t cover Azure DevOps pipelines for Azure Database deployments due to the complexity. It will be analized and explained in a different post.
You may want to visit the first two parts of this serie if you have missed them:
Once we have our code ready to be deployed in a Test, UAT or Production environment you have several options from Visual Studio:
1. Schema Compare and Data Compare utilities. We will compare two databases and replicate code and data from one DB to the other using “Update” button.
2. Deploy manually with generated sql Scripts. This option uses Schema Compare and Data Compare as well but instead of deploying in destination through “Update” in Visual Studio you will generate the scripts and apply them later in your database.
3. Deployment by “Publish” function enabling DACPAC generation. With this method you will publish your Database Project with a DACPAC generated by Visual Studio. This is very powerful and easy to deploy. Also, you will be able to keep the DACPAC history through Source Control.
4. Deployment by importing DACPAC through by sqlPackage.exe utility. In my opinion, this is the most complete option but also the most complicated. You can get the same results than the option 3 but you will use the command line. It’s useful when you are going to implement an automatic or continuous deployment as you will use PowerShell for that.
Let’s explain in detail the four options.
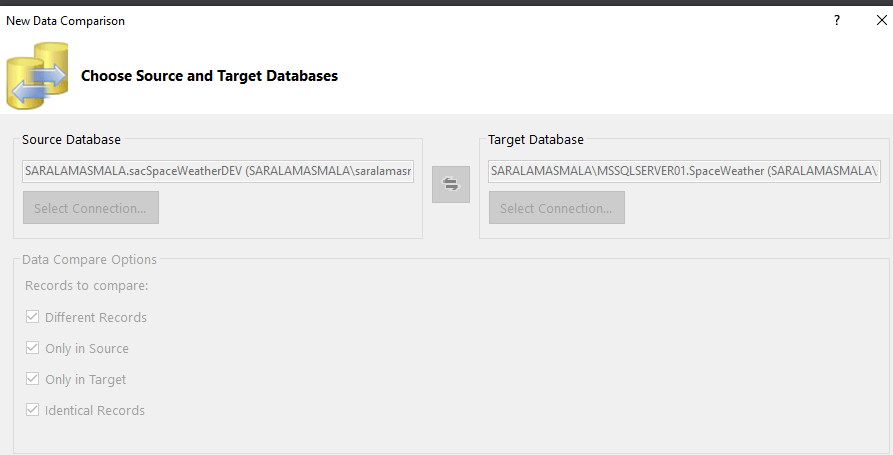
Schema Compare and Data Compare utilities
With this option you will select the source DB where you want to extract the code and data from and the destination DB to where you need to deploy such code and data. The deployment itself happens when clicking “Update” button.
In any SQL Server Database Project you go to Tools/SQL Server/New Schema Compare

This option is very easy to apply and quite visual but it will require quite a lot of knowledge about the database project as it will show you the whole database differences and you will need to select which objects you want to deploy into destination. In addition, you won’t have visibility of the file/object versions you are implementing.
I would recommend this option only for small projects or for moving code and data between Development databases.
In addition, you can move data across databases with Data Compare.
In any SQL Server Database Project you go to Tools/SQL Server/New Schema Compare
You chose the source and target database to compare data in different tables.
Important: You might find your table is not analyzed and you are not sure why. It’s normally because you haven’t defined any primary key to compare both tables as the data will be always compared based on the table primary key.
You should get a result like this where you can select and unselect the tables you want to include/exclude from your comparison.

Click in finish and you get the comparison result as shown below. The “Update Target” button will insert/update/delete the rows accordingly in the destination database.

Again, I would recommend this way of synchronizing data accross DBs only in Dev environments as there is not any visibility and control about what your are deploying but I think it’s very useful for quick data migrations.
Deploy manually with generated sql Scripts
This method is exactly the same than the previous one for Schema and Data changes, but, instead of doing it through “Update” target, you click “Generate Scripts” so Visual Studio generates the sql scripts for you. Then you can save them and apply them over the different instances.

You should see the scripts generated in a new file:

You can save them for later or run them directly in the desired instance.
Deployment by “Publish” function enabling DACPAC generation
I really like this one because it’s easy to implement and you can have full control of which version you deploy.
Before we move further, let’s clarify what I think it’s much more complete than the previous two deployment methods:
1. You deploy a project not schema or data changes. You will generate a DACPAC from your project with the desired code versions.
2. You can audit the changes at database level. You can assign a release version to your DACPAC and it will show when and how that DACPAC was installed in your database.
3. The system will evaluate the changes and only will apply the differences. If you apply a DACPAC with no changes they system will let you know.
From your SQL Database Project you need to make sure your project Builds correctly, otherwise you won’t be able to Publish and so, to generate your DACPAC. It’s very important you add all the dependencies to your project, if not, the build will error out as it will not find the referenced objects.
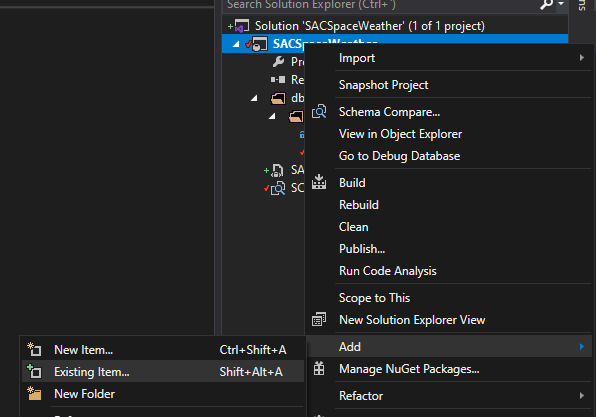
From the project, you can Build it right clicking as shown below.

The build log will give you two important clues for your next step: First, that it run correctly and you are not missing dependencies or general errors. Second, where your DACPAC has been generated. As shown below, I can see the full path or my DACPAC and my Build has been succeeded.

Also I would recommend you add your DACPAC generated into your SQL Database Project, so you can audit the changes as well. I normally add the same to my project by adding existing items functionality.
In this way I can add my DACPAC to Version Control for auditing purposes.

I can see my current DACPAC version in the Project Properties:

Then in Project Settings>Data-tier Application(.dacpac file)>Properties

It will show us an important piece of information that we can compare later with our DB implemented version:

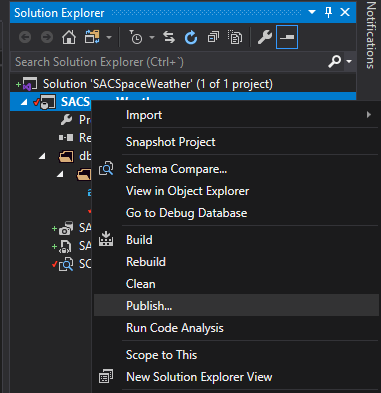
Let’s publish or install our DACPAC. This is extremely easy (I think somehow too easy). Right click on the project and “Publish” option.
You either load an existing profile or create a new one. A profile is simply a DB connection that, once you save it, you can reuse. It’s very handy to deploy through different environments.
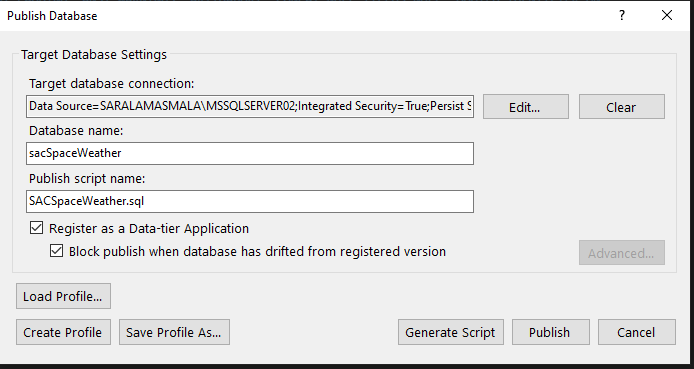
It’s important you select the option “Register as Data-tier Application” so the database can register the DACPAC implementation history.
Then click in Publish. You get confirmation if the publication finishes correctly or fails.

The important thing about this deployment method is you need to have a proper SQL Server Database Project with the objects are going to be included in your DACPAC. It needs to build correctly before you can implement it. It’s not needed you have this project included in your Version Control Project (Git or TFVC) but obviously it would be much recommendable.
How can we check the DACPAC history and status in our database?. I love this part. You can run, on your msdb database, the following queries which will show you quite useful information:
 select action_id,
 instance_id,
 action_type_name,
 dac_object_type_name,
 action_status_name,
 dac_object_name_pretran,
 dac_object_name_posttran,
 created_by,
 date_created
 from sysdac_history_internal

You can see above the system registers the publish action and tracks the project from which has been deployed as well as the date and who performed such action.
select instance_id,
 instance_name,
 type_name,
 type_version,
 database_name,
 created_by,
 date_created
 from sysdac_instances

We can see the version we have deployed in the sysdac_instances. In this case, it was 1.0.0.0
If we deploy the version 1.1.0.0 later on with new changes we will be able to see:
From sysdac_history_internal the following information:

From sysdac_instances:

I don’t like the fact we can’t see the DACPAC version history and we can only see the last one, but you can have an audit per object in SSMS, in Schema Changes History:


You can see the details of every change when expanding the tree:

Deployment by importing DACPAC through by sqlPackage.exe
SqlPackage.exe is a very useful utility for deploying and reporting database changes. You should find the program under Microsoft SQL Server directory in Program Files. The subdirectory where the program is found might vary on your installation. If you can’t find SqlPackage.exe you might need to install it. Please see the download site here.
The generic sintax:
<SQLPACKAGEPATH\SqlPackage.exe> /Action:Publish /SourceFile:<DACPACFilePath\DACPACName> /TargetConnectionString:<TargetConnectionString>
or the simplified sintax:
<SQLPACKAGEPATH\SqlPackage.exe> /a:Publish /sf:<DACPACFilePath\DACPACName> /tcs:<TargetConnectionString>
As example:
“C:\Program Files\Microsoft SQL Server\150\DAC\bin\SqlPackage.exe” /a:Publish /sf:"C:\Users\UserName\source\repos\SACSpaceWeather\SACSpaceWeather\Database1\bin\Debug\SACSpaceWeather.dacpac" /tcs:"Data Source=ServerName;Initial Catalog=DBName;Integrated Security=True;Persist Security Info=False;Pooling=False;MultipleActiveResultSets=False;Connect Timeout=60;Encrypt=False;TrustServerCertificate=False;"
Note the above sintax is the minimum statement for publishing a DACPAC but there are quite a lot of properties and features that you can add to your publication.
As an example, I recommend you the first time you publish your DACPAC you set the property “RegisterDatatierApplication” to true. Otherwise, you won’t be able to record the Database Project release for your Application. It will publish the changes, but you won’t be able to query the changes in sysdac views.
As example:
“C:\Program Files\Microsoft SQL Server\150\DAC\bin\SqlPackage.exe” /a:Publish /sf:"C:\Username\source\repos\SACSpaceWeather\SACSpaceWeather\Database1\bin\Debug\SACSpaceWeather.dacpac" /tcs:"Data Source=ServerName;Initial Catalog=DBName;Integrated Security=True;Persist Security Info=False;Pooling=False;MultipleActiveResultSets=False;Connect Timeout=60;Encrypt=False;TrustServerCertificate=False;" /p:RegisterDatatierApplication=True

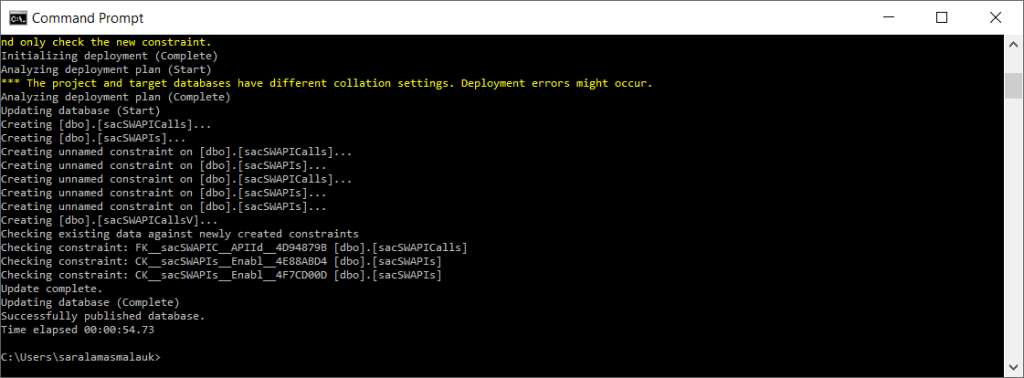
Note all the changes, including the constraints, will be analysed and only incremental changes will be populated into target DB.
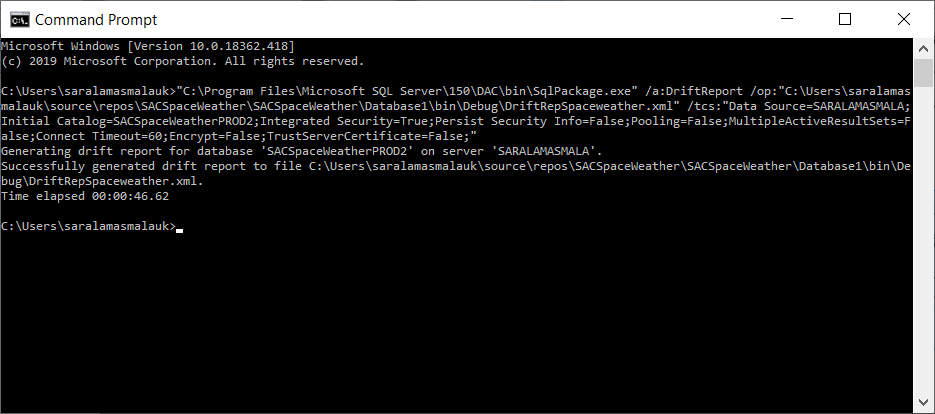
Another nice feature about SqlPackage is the Drift Report. You can get a XML report with all the changes that happened since last time your application was registered.
As an example:
“C:\Program Files\Microsoft SQL Server\150\DAC\bin\SqlPackage.exe” /a:DriftReport /op:"C:\Users\UserName\source\repos\SACSpaceWeather\SACSpaceWeather\Database1\bin\Debug\DriftRepSpaceweather.xml" /tcs:"Data Source=ServerName;Initial Catalog=DBName;Integrated Security=True;Persist Security Info=False;Pooling=False;MultipleActiveResultSets=False;Connect Timeout=60;Encrypt=False;TrustServerCertificate=False;"
And this is all. It’s been quite long but I think it worth it. You have different strategies to deploy Database Applications with Visual Studio or manually if needed.
Please leave a comment if you liked it so I can publish similar posts in the future.
