

After thinking carefully what I wanted to install for having a fully operative Big Data environment it’s time to make it real. Not easy task initially but, surprisingly, it wasn’t that difficult. Let me show you what pages helped me on the installation and what to consider outside of those instructions that worked fine to me.
I created one group called bigdata with two users hadoop and bigdata. Both are in group bigdata. Hadoop installation is owned by hadoop user. The rest of tools are owned by bigdata user. The group bigdata owns all this architecture and it has full privileges on it.
Remember, this installatation is related to the architecture I published on my previous post:
Hands-on Big Data: The Architecture
Hadoop Installation
For my Hadoop installation I followed this link below with the following modifications:
1. I installed Hadoop version 2.7.7.
2. I installed it on ubuntu 19.10.
3. I installed Open JDK 8 instead of the Oracle one.
That configuration works perfectly fine, just be aware of the Open JDK installation steps:
sudo apt install openjdk-8-jdk
Don’t forget adding your JAVA_HOME to your .bashrc, as well as the bin directory to your PATH.
export JAVA_HOME=/usr/lib/jvm/java-8-openjdk-amd64
export PATH=$JAVA_HOME/bin:$PATH
To test your installation you can start the HDFS:
start-dfs.sh
Also check Yarns starts correctly:
start-yarn.sh
If you want to check if your processes are running correctly you can run jps command:
hadoop@salmeda:~$ cd $JAVA_HOME
 hadoop@salmeda:/usr/lib/jvm/java-8-openjdk-amd64$ jps
 12354 Jps
 10870 DataNode
 10728 NameNode
 11256 ResourceManager
 11099 SecondaryNameNode
 11387 NodeManager
Spark Installation
For the Spark installation, I’ve followed this article:
In addition of the steps from link above, I’ve installed Anaconda 3 to get the most of python 3 for Data Analytics (pyspark). See next section if you need Anaconda.
Anaconda 3 Installation
For this installation I simply followed Anaconda documentation in the link below and it worked pretty good.
Hive Installation
This was tricky I must say. Specially because I had this crazy thought: having Dervy as Metastore database is boring, let’s install MySQL and link this DB to the Metastore. Well, it was tough.
I’ve used the following post, but I had to make many changes. I’m showing them below.
I followed everything but in the section “Creating Hive Warehouse Directory” you might get the following error while reviewing the current file system:
hadoop@salmeda:~$ hdfs dfs -ls /
 ls: Call From salmeda/127.0.1.1 to localhost:9000 failed on connection exception: java.net.ConnectException: Connection refused; For more details see:  http://wiki.apache.org/hadoop/ConnectionRefused
This is because the hdfs is down, so don’t forget to start the same:
start-dfs.sh
Also, the commands for creating the different directories didn’t work for me, I used the ones below and I got the dirs created with the correct privileges:
$HADOOP_HOME/bin/hadoop fs -mkdir       /tmp
$HADOOP_HOME/bin/hadoop fs -mkdir -p /user/hive/warehouse
$HADOOP_HOME/bin/hadoop fs -chmod g+w   /tmp
$HADOOP_HOME/bin/hadoop fs -chmod -R g+w   /user/hive/warehouse
$HADOOP_HOME/bin/hadoop fs -chown :bigdata /tmp
$HADOOP_HOME/bin/hadoop fs -chown -R :bigdata   /user
From that Hive installation URL above I didn’t follow further, where they explain how to install Derby up until the end.
Installing MySQL to be used by Hive Metastore
As explained, I didn’t want Derby as RDMS for my Hive Metastore so I installed MySQL. I had to complete some setup in Hive to create the Metastore there. This has been by far the trickiest part of all my installs. I followed the article below for it.
How to Install MySQL in Ubuntu
From the instructions on the link above the only thing I made differently was the “Allow Remote Access” section. I didn’t allow remote access so I don’t need to specify port 3306 when accessing MySQL or when configuring access. Pointing to localhost will be enough for me. You allow remote access if you are accessing the database from a different server, then you need to open the port for that.
Once you have finished the installation follow the steps below to confirm itwent fine:
1. Start MySQL Service:
sudo systemctl start mysql
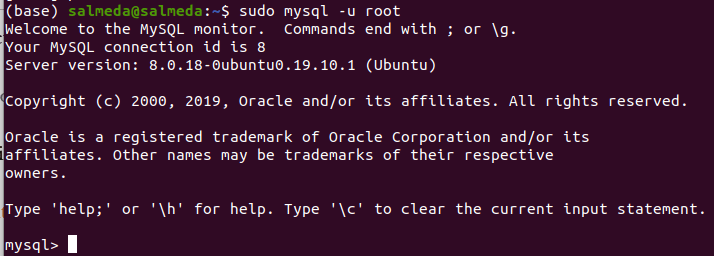
2. Connect as root with the password you specified on your installation:
sudo mysql -u root
If your installation is correct then you should see the terminal with the prompt as below:
Configuring Hive to Use MySQL
After confirming the installation is correct you need to configure MySQL to be used as Metastore Database. I followed the following post.
Metastore Configuration with MySQL
The first thing you need to do is download the MySQL jdbc connector from below:
https://dev.mysql.com/downloads/connector/j/
Once you have installed the connector, copy the file mysql-connector-javaXXXXX.jar from usr/share/java into $HIVE_HOME/lib

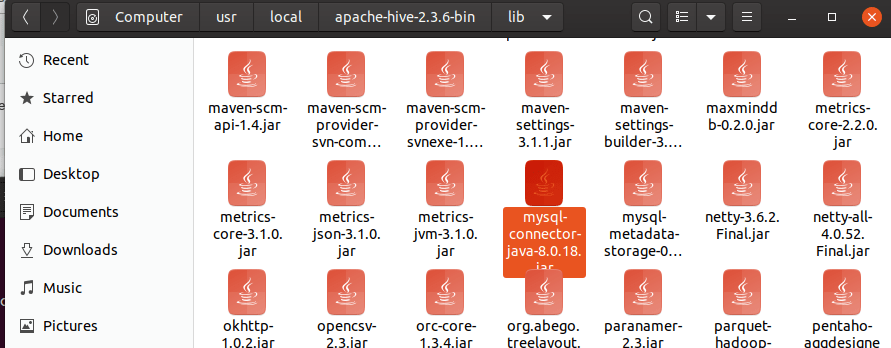
This is a mandatory step so Hive can connect to MySQL via JDBC.
Create Mive Metastore DB in MySQL:

Create database HiveMD;
And then create the admin Hive user for this database:
CREATE USER 'adminHive’@'localhost' IDENTIFIED BY 'XXXXXX';
Where adminHive is the admin user name you want to create and XXXXXX is the password assigned.
You need to create hive-site.xml file if not exist in $HIVE_HOME/conf directory and add the following properties to use MySQL:

<configuration>
<property>
<name>javax.jdo.option.ConnectionURL</name>
<value>jdbc:mysql://localhost/HiveMS?createDatabaseIfNotExist=false</value>
<description>metadata is stored in a MySQL server</description>
</property>
<property>
<name>javax.jdo.option.ConnectionDriverName</name>
<value>com.mysql.cj.jdbc.Driver</value>
<description>MySQL JDBC driver class</description>
</property>
<property>
<name>javax.jdo.option.ConnectionUserName</name>
<value>adminHive</value>
<description>Hive Root User</description>
</property>
<property>
<name>javax.jdo.option.ConnectionPassword</name>
<value>XXXXXXX/value>
<description>User Description</description>
</property>
</configuration>
All configuration has been complete and it’s time to initialize the Metastore to use MySQL.
Run the following statement in $HIVE_HOME/conf
schematool -initSchema -dbType mysql
If successful, you would receive a message like this one:
Metastore connection URL:	 jdbc:mysql://localhost/HiveMS?createDatabaseIfNotExist=false
Metastore Connection Driver :	 com.mysql.cj.jdbc.Driver
Metastore connection User:	 adminHive
Starting metastore schema initialization to 2.3.0
Initialization script hive-schema-2.3.0.mysql.sql
Initialization script completed
schemaTool completed
To test your Hive installation please make sure Hadoop is running and execute:
hive
You should receive a message like this:
Logging initialized using configuration in jar:file:/usr/local/apache-hive-2.3.6-bin/lib/hive-common-2.3.6.jar!/hive-log4j2.properties Async: true
Hive-on-MR is deprecated in Hive 2 and may not be available in the future versions. Consider using a different execution engine (i.e. spark, tez) or using Hive 1.X releases.
Talend Open Studio for Big Data Installation
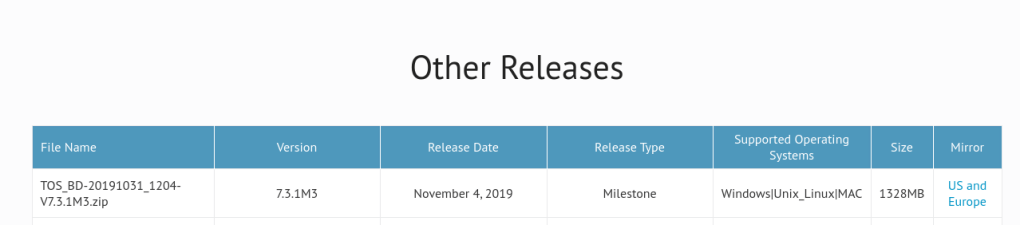
The first step you need to follow is getting the software. The following link will show you the different releases for different operating systems:
https://www.talend.com/products/big-data/big-data-manuals-release-notes/
I installed the following version:
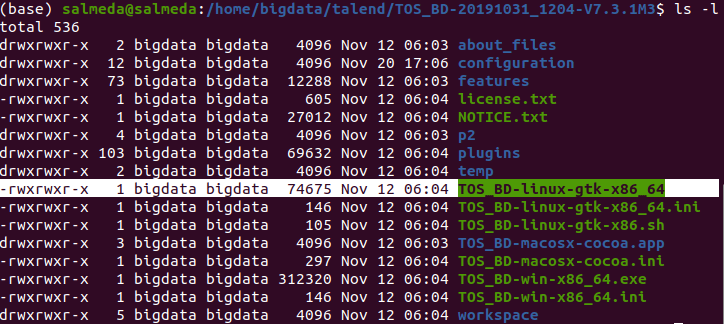
I unzipped the downloaded code and move the directory to home/bigdata. I gave full privileges to bigdata user.
It’s important to know the executable file: TOS_BD-linux-gtk-x86_64
And this is the end of the installation. All services start correctly and seem to be fully operative.
Just as final verification, make sure your .bashrc files look like this for the following users:
hadoop user:
export HADOOP_HOME=/home/hadoop/hadoop-2.7.7
export HADOOP_INSTALL=$HADOOP_HOME
export HADOOP_MAPRED_HOME=$HADOOP_HOME
export HADOOP_COMMON_HOME=$HADOOP_HOME
export HADOOP_HDFS_HOME=$HADOOP_HOME
export YARN_HOME=$HADOOP_HOME
export HADOOP_COMMON_LIB_NATIVE_DIR=$HADOOP_HOME/lib/native
export PATH=$PATH:$HADOOP_HOME/sbin:$HADOOP_HOME/bin
export HADOOP_OPTS="-Djava.library.path=$HADOOP_HOME/lib/native"
bigdata user:
export JAVA_HOME=/usr/lib/jvm/java-8-openjdk-amd64
export PATH=$JAVA_HOME/bin:$PATH
export HADOOP_HOME=/home/hadoop/hadoop-2.8.5
export SPARK_HOME=/home/bigdata/spark/spark-2.4.4-bin-hadoop2.7
export PYTHONPATH=$SPARK_HOME/python:$PYTHONPATH
export PYSPARK_DRIVER_PYTHON="jupyter"
export PYSPARK_DRIVER_PYTHON_OPTS="notebook"
export PYSPARK_PYTHON=python3
export HIVE_HOME=/usr/local/apache-hive-2.3.6-bin
export HIVE_CONF_DIR=/usr/local/apache-hive-2.3.6-bin/conf
export CLASSPATH=$CLASSPATH:/home/hadoop/hadoop-2.7.7/lib/*:.
export CLASSPATH=$CLASSPATH:/usr/local/apache-hive-2.3.6-bin/lib/*:.
export PATH=$PATH:$SPARK_HOME/bin:$SPARK_HOME/sbin:$PYTHONPATH:/home/salmeda/an>
export PATH=$PATH:$SPARK_HOME/bin:$SPARK_HOME/sbin
export HADOOP_USER_CLASSPATH_FIRST=true
I hope you could follow the installation without problems. In the next chapter we can start playing around with data.
